
1. Prepare for migration:
The key prerequisites to perform the migration are:
- The system must be managed by HMC version 7 or later
- The virtual IO server must be at least at version 1.3.
- The physical volume for rootvg must be assigned to the VIO
- Double check that you have the Migration DVD for VIOS and not the Installation DVD for VIOS. (The media for Migration and Installation are different and using the install media will overwrite your current VIOS configuration.)
Prior to any update or migration process, it is strongly recommended to backup the VIO server and check your disaster/recovery process.
Note: It may be useful to record the precise location of the rootvg disks of the VIOS you want to migrate. Before stopping your Virtual I/O Server for migration, you can run the following commands from padmin:
$ lsvg -pv rootvg
rootvg:
PV_NAME PV STATE TOTAL PPs FREE PPs FREE DISTRIBUTION
hdisk0 active 319 11 00..00..00..00..11
hdisk1 active 319 27 00..00..00..00..27
$ lsdev -dev hdisk0 -vpd
hdisk0 U787B.001.DNW025F-P1-C5-T1-W500507630E0009E2-L4010400000000000 MPIO Other FC SCSI Disk Drive
$ lsdev -dev hdisk1 -vpd
hdisk1 U787B.001.DNW025F-P1-C5-T1-W500507630E0009E2-L4010400100000000 MPIO Other FC SCSI Disk Drive
In our example both disks are Fiber Attached disks, that’s why we have the slot number, worldwide name of the fiber channel adapter and the LUN id of the disks. From the migration menu you should be able to have some of this information.
This step is not required for the migration to succeed, the migration menu should be able to find the good VIOS rootvg disk to migrate, but in certain configurations it may be needed to check we are about to migrate the right disk or manually select it.
1. What happens during migration?
The purpose of migration is to change the VIOS software to the most recent and attempt to preserve your configuration files.
The migration process saves configuration files, install the new software on your system and then restore your configuration files. At the end of the migration process, you should be able to find most of your configuration files.
In a single VIO server configuration, during the migration, the client partition needs to be shutdown. Once the migration is complete and the VIO has been restarted, the client partition can be brought up without any further configuration. In a dual VIO server environment, you can update one VIO server at a time as to avoid any interruption of service to the clients. The client partition can be up and running through the migration process of each of the VIO servers.
1. How to migrate?
Before you start double-check that the following statements are true:
- The managed system’s HMC is attached to the system, and both the managed system and HMC are working properly.
- A DVD optical device is allocated to the VIOS partition, if not, perform a DLPAR operation or modify the partition profile, to do so.
- The VIOS Migration media is inserted in your optical device.
- If you don’t have a recent backup, run backupios command and keep the output file in a safe location
- Note the location of the rootvg disks
Before shutting down the VIO server you want to migrate, we would recommend to check the following:
- In a dual VIOS environment, check that the alternate VIOS is up and running, and is serving I/O to client. (SEA failover, virtual SCSI mapping, and so on…)
- In case of LVM mirroring on clients, check that both disks of any mirrored volume group are available in the system and the mirroring is properly synchronized.
If any of the following steps in the process of migration fails, please contact your Support Service Representative for further help and debugging.
1. Activate the VIOS partition in SMS mode :
a. Insert the Virtual I/O Server migration DVD in the optical device allocated to VIOS
b. From the HMC GUI, select your VIOS partition.
c. Click on Tasks à Operations à Activate.
d. Select the proper profile from the popup window that appears. (Profile with rootvg disk from the VIOS and DVD optical device allocated.)
e. Select “Open a terminal window or console session” to have the console during the boot and migration process.
f. Click on Advance button, and select “SMS” as boot mode.
g. Click OK twice (one to validate the SMS boot and the other boot the partition).


At this step a Java window is opened and gives you the console. The partition will go through all standard hardware checking and continue its boot process until reaching the SMS menu.
1. Select the boot device from SMS menu
a. Type the “Select Boot Option” number and press enter.
b. Type the “Select the Install/Boot device” number and press enter.
c. Type the number of the DVD device and press enter. You can also use the “List all devices” function, but in case you have many devices attached (such as Ethernet adapter, fiber channel adapter and/or disks…) this function might take long time to scan all those devices.
d. Select the “Normal mode boot”, press enter and validate all your choices by selecting “Yes” and press enter.

Top left figure 4: Root of the SMS menu. (step a.)
Middle figure 5: Root of the boot/install menu from the SMS. (step b)
Low right figure 6: Boot type selection menu (step d)
The boot process on the DVD will start, and you should be able to follow the different stages of boot by observing the LED code on the operator panel of the partition from the HMC GUI, until the system prompts you for the next migration step:
1. Migrate the VIO server
a. Select the desired console.
b. Select the language you want during the installation.
c. Double check that you are facing the “Migration menu” and NOT the “Install menu”. (See the screen copy below)
Note: Be aware that if you install the VIOS instead of migrating it, you will be unable to recover your configuration and you’ll have to restore or reconfigure your entire environment.
d. Select “Continue with Install” to start the install process.
 Figure 7: Installation Menu
From the first menu of the installation there’s no indication of the installation type. We can not confirm if we are migrating our VIO server or just installing it. But at this step our current VIO installation is still safe.
 Figure 8: Installation Menu after selecting option 2 in Figure 7
On this screen, we can see that we have booted our system from the VIOS Migration Media. If you selected the option 2 on the previous screen, and you don’t have a menu similar to the one above, you should stop the migration process at once. Check you have inserted the appropriate media into the Optical Device, and also you have allocated the correct slot to your VIO server partition.
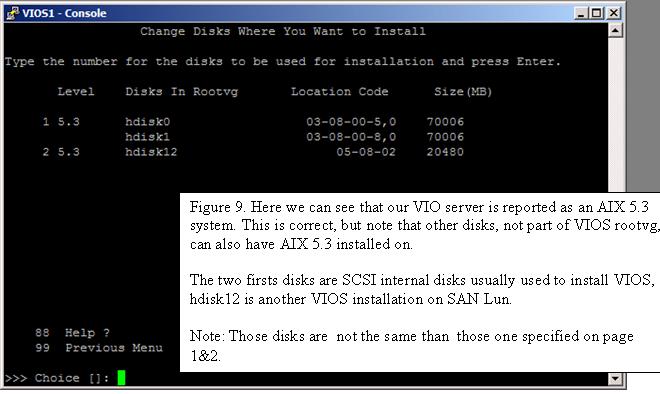
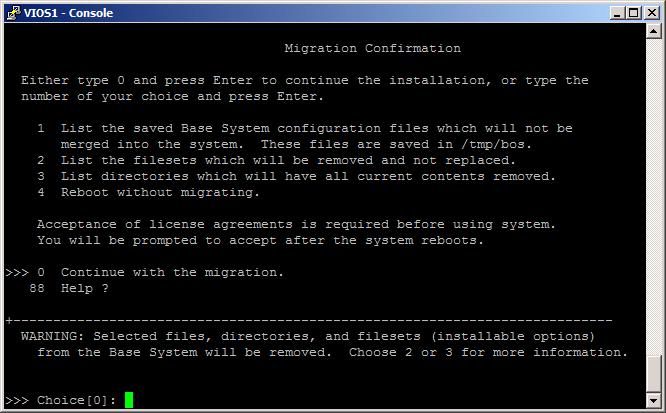
Figures 9 and 10: Installation Menu to choose the disks and confirm Migration respectively
This is the last screen before the migration really starts, so this is our last chance to avoid the currently installed VIOS to be overwritten.
From this menu you can check what will be changed and/or removed from your configuration.
All your SCSI mappings and network configuration should be available after migration, but if you installed third party application or made special configuration to your VIO you should probably check here if those modifications will be preserved or not.

1. Checking Migration and some debug help:
At the end of the Migration you will be prompted to accept the license, and eventually install other software. Then you can exit and connect to the system using “padmin” user.
Check that your previous configuration has been properly restored by the migration process.
$ ioslevel
2.1.0.0
$ lsmap -all
SVSA Physloc Client Partition ID
--------------- -------------------------------------------- ------------------
vhost0 U9113.550.10BE8DD-V1-C11 0x00000003
VTD lpar1vg0
Status Available
LUN 0x8100000000000000
Backing device lpar1_rootvg
Physloc
…
$ lstcpip
Name Mtu Network Address ZoneID Ipkts Ierrs Opkts Oerrs Coll
en2 1500 link#2 a6.24.d0.0.10.3 27642 0 8402 0 0
en2 1500 9.3.131 zlab081 27642 0 8402 0 0
lo0 16896 link#1 1197 0 1201 0 0
lo0 16896 127 localhost 1197 0 1201 0 0
lo0 16896 ::1 0 1197 0 1201 0 0
If this is not the case, and you’re back to another configuration or a fresh install configuration, check your VIOS is booted on the correct hdisk, check the media used was the one for migration.
1. Migrate your VIO Server using NIM:
First of all we need to create the appropriate resources for migration.
There are two methods to create the appropriate resources and start NIM migration:
The installios command is the preferred method for creating NIM resources for VIOS migration.
If you wish to manually create an lpp_source without using the installios command, you must use the procedure provided below. The following steps will create a valid VIOS Migration lpp_source + spot and initiate a VIOS migration:
a. Use the gencopy command to copy ALL of the install images from the VIOS Migration DVD to the desired filesystem location on the NIM master. This operation will require approximately 3GB of free space on the target filesystem and will take several minutes to complete:
# gencopy -d /dev/cd0 -t /export/lpp_source/vios_migration_lpp all
b. When the gencopy command completes successfully use NIM to define an lpp_source, specifying the above directory as the 'location' attribute. The following command uses the NIM master to serve the lpp_source:
# nim -o define -t lpp_source -a location=/export/lpp_source/vios_migration_lpp -a server=master vios_migration_lpp
c. At this point you will have defined a valid NIM VIOS Migration lpp_source named 'vios_migration_lpp'. When creating a NIM SPOT resource to be used for the VIOS migration operation you can choose to specify either this lpp_source or the VIOS Migration DVD as a source:
# nim -o define -t spot -a location=/export/spot -a server=master -a source=vios_migration_lpp vios_migration_spot
or
# nim -o define -t spot -a location=/export/spot -a server=master -a source=/dev/cd0 vios_migration_spot
d. The VIOS migration can now be initiated by issuing a 'bos_inst' operation from NIM, specifying the lpp_source and spot created in steps 2 and 3:
# nim -o bos_inst -a spot=vios_migration_spot -a lpp_source=vios_migration_lpp ...
The bos_inst operation will default to migration, provided that the existing rootvg on the target system contains VIOS from a prior release. Keep in mind that the VIOS migration will fail if VIOS is already at the version that you are attemping to migrate to.
5.2. Method two:
To create the lpp_source, insert the VIO 2.1 Migration media in the optical device allocated to your NIM master
Using smitty :
# smitty nim_mkres
- Select resource type : lpp_source
- Enter the name you want for your resource.
- Enter the resource name for Server of Resource (usually “master”)
- Enter the fully qualified path to your lpp_source in “Location of Resource”
- Select cdX as “Source of Install Images”
- Enter “all” for “Names of Option Packages”
Note: . Using the VIOS Migration DVD as a source will not produce a valid lpp_source that can be used for migrating a VIOS system, if you do not enter “all” for“Names of Option Packages”
When your lpp_source is created you can check the simages attribute is “yes” with “lsnim –l yourlpp” command.
a. Create the spot.
# smitty nim_mkres
- Select resource type: spot
- Enter the name you want for your spot resource
- Enter the resource for Server of Resource (usually “master”)
- Enter the fully qualified path to your spot in “Location of Resource”
- Select the lpp_source you previously created as “Source of Install Images”
b. Create the resource for your VIO.
- Check the name resolution and routing are good to access your VIOS from the NIM master. (Use ‘host’, ‘traceroute’… command)
- Using smitty :
# smitty nim_mkmac
- Enter the hostname of the VIOS, if network is properly configured, this should fill up the other required information (related to network configuration, such as NIM network and Host Name) with appropriate value.
- Machine Type is Standalone
- Hardware Platform Type is chrp
- Kernel to use for Network Boot is “64” (due to AIX 6.1 only support 64bits kernel
- Cable Type: usually tp
c. Prepare the NIM master for installation.
Now, all the required NIM resources are ready to use, we can process to installation itself.
Using smitty :
# smitty nim_bosinst
- Select the client we previously defined. (Our VIOS)
- Select Installation Type: “rte - Install from installation images”
- Select the lpp_source we previously created
- Select the spot we previously created.
- Set “ACCEPT new license agreements?” to yes
- Set “Initiate reboot and installation now?” to no
d. Migrate the VIOS
Follow the procedure described under section 3.1 to restart your VIOS partition in SMS mode.
From the SMS menu on the console, follow this procedure:
Note that depending on your hardware platform and the firmware release of your system the menu can be slightly different.
- Select “Setup Remote IPL (Initial Program Load)”
- Select the appropriate adapter to boot on. (For VIO it should be a physical adapter unless your nim master is in the same CEC and on dedicated virtual network)
- Select “IP parameters” and check the configuration is good to access the nim master.
- Select “Adapter Configuration” and check speed/duplex and protocol used. (If you encounter some problem to ping or boot on network, set speed/duplex to auto/auto, sometimes fixed negotiation does not work.)
- Check that “Advanced Setup” is set to “BOOTP”
- Perform a “Ping Test”, if it fails double check above network setting, network hardware, switch and firewall configuration…
- If all the above works fine, go back to the root sms menu, and select “Select Boot Options”.
- Choose “Select Install/Boot Device”
- Select “Network”
- Choose the adapter we configured above.
- Select “Normal Mode Boot”
- And validate all the above by selecting “Yes”.
The boot process will start and you should see bootp request and tftp packet count appear soon, and lead you to the Migration menu seen in Figure 14.
The firsts install menu is the same than migration process from DVD, but if you select the option “Change/Show installation Setting and Install”.

This migration menu is very different than the one we saw during the migration from DVD. This one is the same as during an AIX standard installation. You should check that the “Method of Installation” is Migration and the “Disk where you want to install” is set to the disk on which the VIOS was installed. (You can use the location code we collect in section
1)
You can check from your NIM master that the lpp_source allocated to your VIOS is in fact the lpp_source for migration purpose :
$ nim –o showres | grep “ios\.”
ios.cli.rte 6.1.2.0 I N usr,root
ios.cli.smit 6.1.2.0 I N usr,root
ios.cli.man.ca_ES 6.1.2.0 I N usr
ios.cli.man.en_US 6.1.2.0 I N usr
ios.cli.man.es_ES 6.1.2.0 I N usr
ios.cli.man.fr_FR 6.1.2.0 I N usr
ios.cli.man.it_IT 6.1.2.0 I N usr
ios.cli.man.ja_JP 6.1.2.0 I N usr
ios.cli.man.pt_BR 6.1.1.0 I N usr
ios.cli.man.pt_PT 6.1.1.0 I N usr
ios.ldw.gui 1.1.0.0 I N usr
ios.ldw.rte 6.1.2.0 I N usr
ios.lparmgr.cim.rte 6.1.2.0 I N usr
ios.lparmgr.cli.rte 6.1.2.0 I N usr,root
ios.lparmgr.gui.base.rte 6.1.2.0 I N usr
ios.lparmgr.gui.httpd.rte 6.1.2.0 I N usr
ios.lparmgr.gui.nlv 6.1.2.0 I N usr
ios.migration.rte 6.1.2.0 I N usr,root
ios.paging.rte 1.2.0.0 I N usr,root
ios.sea 6.1.2.0 I b usr,root
itm.vios.agent 6.1.1.1 I N usr,root
$ lsnim –l
à you should see a line “lpp_source = lpp_migration_vio”.
If all of that is correct you can pursue the migration process and validate your migration. This will give you the following screen:
1. Migrating an IVM:
This procedure was tested on a JS22 hardware platform, but it should be very close to any other system P platform, only hardware related command/operation should be different.
As to avoid any sudden stop/crash, you should properly shutdown all the client lpars before starting the migration process.
Also check that the “Media Tray” is allocated to the appropriate blade. You can check this from the management module GUI. On the “System status” panel, an X should indicate the blade that owns the “Media Tray”. If your blade does not own DVD device, you can allocate it from the “Remote control” panel on management module GUI, set the Media Tray owner to the blade you want to migrate.
If you are on a standalone system P (e.g.: no hmc connected) the DVD device should be allocated to VIO partition when you reboot on, and so you should be able to boot on DVD from SMS.
Open a terminal console on your blade to follow the whole boot process:
From an AIX telnet session (or DOS command line), telnet to the management module and enter the current username and password. When connected you can open a console by running:
# console –T blade[X]
Where X is the bay number in which your blade stands.
To exit the console opened type [esc] and [(] (escape key and open bracket key)
Perform a shutdown of the VIO server, and power it on from the management module “Power/Restart” Panel. As soon as the blade is powered on, check on the console already opened until you see the following screen:

Figure 12. When the “keyboard” word appears press button 1 on your keyboard to access the SMS menu.
1. Select the boot device from SMS menu
a. Type the “Select Boot Option” number and press enter.
b. Type the “Select the Install/Boot device” number and press enter.
c. Type the number of the DVD device and press enter. You can also use the “List all devices” function, but in case you have many devices attached (such as Ethernet adapter, fiber channel adapter and/or disks…) this function might take long time to scan all those devices.
d. Select the “Normal mode boot”, press enter and validate all your choices by selecting “Yes” and press enter.

Figure 13. Note: On JS22 system, the Optical device is USB.

Note: On JS22 the number to type may not be the “1” as usually seen on vterm from standard managed system.
The installation process is exactly the same as described in 3.3 to migrate a VIO server.
Here are some screenshots of the different files which can be provided by the “Migration confirmation” menu:

Figure 15. Files saved during the migration process, these files are saved in /tmp/bos directory during the migration 


The list of directories that will have their content removed during the migration. This directory contains only obsolete data (e.g. /tmp) or information used during update and so not required because we are changing the system release during the migration.
1. Collecting debugging information on failed migration:
If the install process does not start correctly, the problem determination might require the following elements:
If your 1.X VIO server is still up and running, please collect the “snap” output run with padmin user authority.
If you are unable to reboot the VIOS partition in SMS mode, please note the latest reference code that appeared on the operator panel, your system firmware version, and HMC version and contact HW support representative.
If no boot image is found on the media when you try to boot from the DVD, please check you correctly inserted the VIO Server Migration DVD into the drive.
If the boot and/or installation starts but fails at any point we need to collect a debug boot output and the content of the install.
To collect the debug boot output, follow the following procedure :
- connect as a standard user on an AIX system
- from this AIX session start logging the output from your session with the following command :
> script debug_boot.out
- from this session connect to the VIO’s managed system’s HMC using ssh:
> ssh hscroot@hmc
- from the command line interface on HMC, open a terminal window to your VIOS server
> vtmenu
or
> mkvterm –m --id
if a console is already open you can close it with the following command before opening a new one:
> rmvterm –m --id
- from the HMC GUI, reboot your VIOS partition to "Open Firmware - OK Prompt"
- from the opened console, when “(OK)> “ appears type the following :
> boot –s verbose –s debug
- pursue the installation as usual until it fails
- close your terminal session using key sequence “~.” and [enter] (sometimes it is required to type this sequence twice.), this should cause your ssh session to HMC to be closed also.
- End your script operation by typing the “exit” command.
Provide the snap and debug_boot.out file to your Support for further investigation.
No comments:
Post a Comment