Tanti Technology

My photo
Bangalore, karnataka, India
Multi-platform UNIX systems consultant and administrator in mutualized and virtualized environments I have 4.5+ years experience in AIX system Administration field. This site will be helpful for system administrator in their day to day activities.Your comments on posts are welcome.This blog is all about IBM AIX Unix flavour. This blog will be used by System admins who will be using AIX in their work life. It can also be used for those newbies who want to get certifications in AIX Administration. This blog will be updated frequently to help the system admins and other new learners. DISCLAIMER: Please note that blog owner takes no responsibility of any kind for any type of data loss or damage by trying any of the command/method mentioned in this blog. You may use the commands/method/scripts on your own responsibility. If you find something useful, a comment would be appreciated to let other viewers also know that the solution/method work(ed) for you.

Thursday, 14 November 2013

CREATING A SHARED LOGICAL VOLUME AND FILE SYSTEM IN HACMP


Move cursor to desired item and press Enter.

smitty Hacmp

  Initialization and Standard Configuration
  Extended Configuration
<< System Management (C-SPOC) >>
 
  Problem Determination Tools


System Management (C-SPOC)

Move cursor to desired item and press Enter.

  Manage HACMP Services
  HACMP Communication Interface Management
  HACMP Resource Group and Application Management
  HACMP Log Viewing and Management
  HACMP File Collection Management
  HACMP Security and Users Management
<< HACMP Logical Volume Management >>
  HACMP Concurrent Logical Volume Management
  HACMP Physical Volume Management
  Configure GPFS


HACMP Logical Volume Management


  Open a SMIT Session on a Node
Shared Logical Volumes
Move cursor to desired item and press Enter.
  << Shared Volume Groups >>
 
  Shared File Systems
  Synchronize Shared LVM Mirrors
  Synchronize a Shared Volume Group Definition


Shared Logical Volumes

  List All Shared Logical Volumes by Volume Group
<< Add a Shared Logical Volume >>
  Set Characteristics of a Shared Logical Volume
  Show Characteristics of a Shared Logical Volume
  Change a Shared Logical Volume
  Remove a Shared Logical Volume


    +--------------------------------------------------------------------------+
    |      Shared Volume Group Names                                          |
    |                                                                         |          
 
    |     Move cursor to desired item and press Enter.                        |
    |       RG1   sharedvg                                                    |
    |                                                                         |
    | Esc+1=Help              Esc+2=Refresh Esc+3=Cancel                      |
    | Esc+8=Image             Esc+0=Exit Enter=Do                             |
  Es| /=Find                  n=Find Next                                    
 
     -----------------------------------------------------------------------+


   +--------------------------------------------------------------------------+
   |                          Physical Volume Names                           |
   |                                                                          |    |     Move cursor to desired item and press Esc+7.                         |
   |     ONE OR MORE items can be selected.                                   |
   | Press Enter AFTER making all selections.                                 |
   |                                                                          |
   |   Auto-select                                                            |
   |   pci     hdisk3                                                         |
   | Esc+1=Help              Esc+2=Refresh  Esc+3=Cancel                      |
   | Esc+7=Select            Esc+8=Image Esc+0=Exit                           |
 Es| Enter=Do                /=Find n=Find Next                   Esc+8=Image |
 Es+--------------------------------------------------------------------------+


Add a Shared Logical Volume

Type or select values in entry fields.
Press Enter AFTER making all desired changes.

                                                        [Entry Fields]
  Resource Group Name                                 RG1
  VOLUME GROUP name                                sharedvg
  Reference node
* Number of LOGICAL PARTITIONS                       [4]
  PHYSICAL VOLUME names
  Logical volume NAME                           [sharelvol]
  Logical volume TYPE                                [jfs2]
  POSITION on physical volume                        middle
  RANGE of physical volumes                         minimum
  MAXIMUM NUMBER of PHYSICAL VOLUMES                 []
    to use for allocation
  Number of COPIES of each logical                    1
    partition
  Mirror Write Consistency?                           yes
  Allocate each logical partition copy                yes
    on a SEPARATE physical volume?
  RELOCATE the logical volume during reorganization?  yes
  Logical volume LABEL                            [testvol]
  MAXIMUM NUMBER of LOGICAL PARTITIONS               [512]
  Enable BAD BLOCK relocation?                        yes
  SCHEDULING POLICY for reading/writing            parallel
    logical partition copies
  Enable WRITE VERIFY?                                no
  Stripe Size?                               [Not Striped]


System Management (C-SPOC)Move cursor to desired item and press Enter.

  Manage HACMP Services
  HACMP Communication Interface Management
  HACMP Resource Group and Application Management
  HACMP Log Viewing and Management
  HACMP File Collection Management
  HACMP Security and Users Management
  <>
  HACMP Concurrent Logical Volume Management
  HACMP Physical Volume Management
  Configure GPFS

  Open a SMIT Session on a Node


HACMP Logical Volume Management

Move cursor to desired item and press Enter.

  Shared Volume Groups
  Shared Logical Volumes
 << Shared File Systems >>
  Synchronize Shared LVM Mirrors
  Synchronize a Shared Volume Group Definition

Shared File Systems

Move cursor to desired item and press Enter.

  Journaled File Systems
  << Enhanced Journaled File Systems >>
 

Move cursor to desired item and press Enter.


Enhanced Journaled File Systems  Add an Enhanced Journaled File System
 <<  Add an Enhanced Journaled File System on a Previously Defined Logical Volume >>
 
  List All Shared File Systems
  Change / Show Characteristics of a Shared Enhanced Journaled File System
  Remove a Shared File System


  Add an Enhanced Journaled File System on a Previously Defined Logical Volume


  +--------------------------------------------------------------------------+
  |                           Logical Volume                                 |
  |                 Move cursor to desired item and press                    |
  |                                                                          |
  |   sharelvol       server1,server2                                                |
  |                                                                          |
  |  Esc+1=Help              Esc+2=Refresh           Esc+3=Cancel            |
  | Esc+8=Image                                       Enter=Do               |
  | /=Find                  n=Find Next Es+--------------------------------------------------------------------------+


      Add an Enhanced Journaled File System on a Previously Defined Logical Volume

Type or select values in entry fields.
Press Enter AFTER making all desired changes.

                                                                              [Entry Fields]

  NodeNames                                            server1,server2
  LOGICAL VOLUME name                                 sharelvol
* MOUNT POINT                                       [/testshare]
  PERMISSIONS                                        read/write
  Mount OPTIONS                                               []
  Block Size (bytes)                                         4096
  Inline                                                      no
  Inline Log size (MBytes)                                    []

Press enter to accept


                                                                         COMMAND STATUS

Command: OK            stdout: yes           stderr: no

Before command completion, additional instructions may appear below.

server1: mkfs completed successfully.
server1: 65328 kilobytes total disk space.
server1: New File System size is 131072


# df
Filesystem    512-blocks      Free %Used    Iused %Iused Mounted on
/dev/hd4           65536     21544   68%     1816    12% /
/dev/hd2         1638400    231080   86%    24337    12% /usr
/dev/hd9var       262144     49232   82%     1224     4% /var
/dev/hd3          131072     97696   26%     2004    13% /tmp
/dev/hd1           65536     63296    4%       46     1% /home
/proc                  -         -    -         -     -  /proc
/dev/hd10opt       65536     46552   29%      390     5% /opt
/dev/sharelvol     131072    130392    1%        4

Wednesday, 13 November 2013

Install AIX from scratch with screenshots

The screenshots are from an installation of AIX 7.1 onto a partition

AIX installation in pictures

Image

Boot

Image
Installation starts with booting from media. In this case, from the AIX 7.1 DVD media.

Select Install Screen

Image
First we have to tell AIX which screen we are installing from. AIX sends a message to each screen -
whether it is a tty or lft (low function graphic terminal) with a number. Press that number followed by
the Enter key. The other displays clear and AIX continues with the selected screen.

Install Language

Image
The first choice you need to make is language. English is pre-selected so just press enter.

Welcome to AIX

Image
Although you could go through life accepting defaults, I prefer option 2 when installing AIX.

Installation Settings

Image
Use option 1 to ensure it is a New & Overwrite install - let's be fresh!
Then use option 2 to select your language of choice. I prefer using the USA English.

Set Primary Languge

Image
After you select option 2 note that the default choice is the next screen. Continue scrolling and enter your language number.
The screen after that is the keyboard selection. I always choose the "smaller" keyboard - option 1.
Image

Security

Image
For an initial install the defaults are probably fine, but let's take a peek.
Option 3 please.

Security Models

Image
Do not start with Trusted AIX. That is an advanced topic we shall cover on another day. Since we are
looking at options - Option 2 please.

Standard Security Options

Image

Install Options

Image

Normally you will leave all these options at yes.
Option 1. Graphics Software. X11 applications can run in client mode. This does not, by default, enable an
X11 server. Unless security policy specifically prohibits it, leave this option at yes.
Option 2. System Management Client Software. Highly recommended to leave this at yes for ease of remote
management of this system.
Option 3. AIX6 and higher is 64-bit kernel. JFS2 is optimized for an 64 bit-kernel. The is really no reason
not to use JFS2. Leave this at yes. You will need to reinstall AIX to get it into JFS2 if you do not.
Option 4. Enable System Backups to install to any system. This is an aid to system cloning. Leaving it to yes means
AIX installs many more filesets (nearly 500) and the install time takes longer. Sooner or later
all the filesets will be installed. Why, how and/or when you ask? When you update AIX to a (new) technology level
one of the side-effects is that all device drivers get installed. This is to prevent a mixture of device
drivers coming from different TL and or service-pack combinations. The recommendation is to leave it at yes.
Press Enter please (option 5 pre-selected)
 

Install More Software

Image

These options are all no by default.
Option 1: Firefox. If you want to work with Firefox on AIX change this to yes. The install process will prompt
you for the correct DVDs at the appropriate time to install Firefox. You can also do this later
using the smitty easy_install option to install the Firefox bundle.
Option 2: Not many people need Kerberos. If you do - switch to yes and the installation procedure prompts you
at the correct moment for the expansion DVD. What expansion DVD you ask? Then leave this at no. Again,
smitty easy_install will install the kerberos bundle later.
Option 3: Server. Back in the CDROM days you would install extra software from the second CDROM. It all fits
on one DVD now so you want get prompted for Volume 2 anymore. Why this option then? Think of it as the
opposite of "Secure by Default". This options installs the optional server filesets.

Take note: the next default action is to start installation. Press Enter!

Installation Summary

Image

IBM would not be IBM (I guess) if it did not provide a summary screen (rather than a simple "Are you sure Y/N".
This screen summarizes what you have chosen. Default (option 1) is to really start installation, but you can
go back to the main installation menu (option 99) and make any changes you desire.

Installing Base Operating System

Image

Once you see a screen like this, AIX installation has really started. A lot of information will scroll over the screen, but basically, you are done. Installing AIX from a DVD takes from 30 to 60 minutes - depending largely on the speed of the disks being written to. But then I test on systems that are 5+ years old. When I am on new hardware (at customers) installs take about 20 minutes.
When the installation is finished AIX reboots and configuration begins

Tuesday, 12 November 2013

Moving an LPAR to another frame


Moving an LPAR to another frame

Steps for migrating LPAR from ONE Frame to Another IBM Frame

1.Have Storage zone the LPARs disk to the new HBA(s). Also have them add an additional 40GB drive for the new boot disk. By doing this we have a back out to the old boot disk on the old frame.

2. Collect data from the current LPAR:

a. Network information – Write down IP and ipv4 alias(s) for each interface

b. Run “oslevel –r” - will need this when setting up NIM for the mksysb recovery

c. Is the LPAR running AIO, if so will need to configure after the mksysb recovery

d. Run “lspv”, save this output, contains volume group and PVID information

e. Any other customizations you deem neccessary


3. create mksysb backup of this LPAR

4. Reconfigure the NIM machine for this LPAR, with new Ethernet MAC address. Foolproof method is to remove the machine and re-create it.

5. In NIM, configure the LPAR for a mksysb recovery. Select the appropriate SPOT and LPP Source, base on “oslevel –r” data collected in step 2.

6. Shut down the LPAR on the old frame (Halt the LPAR)

7. Move network cables, fibre cables, disk, zoning

8. if needed, to the LPAR on the new frame

9. On the HMC, bring up the LPAR on the new frame in SMS mode and select a network boot. Verify SMS profile has only a single HBA (if Clarrion attached, zoned to a single SP), otherwise the recovery will fail with a 554.

10. Follow prompts for building a new OS. Select the new 40GB drive for the boot disk (use lspv info collected in Step 2 to identify the correct 40GB drive). Leave defaults for remaining questions NO (shrink file systems, recover devices, and import volume groups).

11. After the LPAR has booted, from the console (the network interface may be down):

a. lspv Note the hdisk# of the bootdisk

b. bootlist –m normal –o Verify boot list is set – if not, set it

bootlist –m normal –o hdisk#

c. ifconfig en0 down If interface got configured, down it

d. ifconfig en0 detach and remove it


e. lsdev –Cc adapter Note Ethernet interfaces (ex. ent0, ent1)

f. rmdev –dl Remove all en devices

g. rmdev –dl Remove all ent devices

h. cfgmgr Will rediscover the en/ent devices

i. chdev –l -a media_speed=100_Full_Duplex Set on each interface unless

running GIG, leave defaults


j. Configure the network interfaces and aliases Use info recorded from step 2 mktcpip –h -a -m -i -g -A no –t N/A –s

chdev –l en# -a alias4=,


k. Verify that the network is working.


12. If LPAR was running AIO (data collected in Step 2), verify it is running (smitty aio)

13. Check for any other customizations which may have been made on this LPAR

14. Vary on the volume groups, use the “lspv” data collected in Step 2 to identify by PVID a hdisk in each volume group. Run for each volume group:

a. importvg –y hdisk# Will vary on all hdisk in the volume group

b. varyonvg 

c. mount all Verify mounts are good

15. Verify paging space is configured appropriately

a. lsps –a Look for Active and Auto set to yes

b. chps –ay pagingXX Run for each paging space, sets Auto

c. swapon /dev/pagingxx Run for each paging space, sets Active


16. Verify LPAR is running 64 bit

a. bootinfo –K If 64, you are good


b. ln –sf /usr/lib/boot/unix_64 /unix If 32, change to run 64 bit

c. ln –sf /usr/lib/boot/unix_64 /usr/lib/boot/unix

d. bosboot –ak /usr/lib/boot/unix_64


17. If LPAR has Power Path

a. Run “powermt config” Creates the powerpath0 device

b. Run “pprootdev on” Sets Power Path control of the boot disk

c. If Clariion, make configuration changes to enable SP failover


chdev -l powerpath0 -Pa QueueDepthAdj=1

chdev –l fcsX –Pa num_cmd_elems=2048 For each fiber adapter

chdev –l fscsiX –Pa fc_err_recov=fast_fail For each fiber adapter

d. Halt the LPAR

e. Activate the Normal profile If Sym/DMX – verify two HBA’s in profile

f. If Clarrion attached, have Storage add zone to 2nd SP

i. Run cfgmgr Configure the 2nd set of disk


g. Run “pprootdev fix” Put rootdisk pvid’s back on hdisk

h. lspv grep rootvg Get boot disk hdisk#

i. bootlist –m normal –o hdisk# hdisk# Set the boot list with both hdisk


20. From the HMC, remove the LPAR profile from the old frame

21. Pull cables from the old LPAR (Ethernet and fiber), deactivate patch panel ports

22. Update documentation, Server Master, AIX Hardware spreadsheet, Patch Panel spreadsheet

23. Return the old boot disk to storage.

Migration of AIX LPAR from one hardware to other


Supported Methods of Duplicating an AIX System


Technote (FAQ)

Question
I would like to move, duplicate, or clone an AIX system onto another partition or hardware. How can I accomplish this?


Answer
This document describes the supported methods of duplicating, or cloning, an AIX instance to create new systems based on an existing one. It also describes methods known to us that are not supported and will not work.
Why Duplicate A System?
Duplicating an installed and configured AIX system has some advantages over installing AIX from scratch, and can be a faster way to get a new LPAR or system up and running.

Using this method customized configuration files, installation of additional AIX filesets, application configurations and tuning parameters can be set up once and then installed on another system or partition.


Supported Methods

1. Cloning a system via mksysb backup from one system and restore to new system.

This can either be a mksysb backup of the rootvg from the source system to tape, DVD, or a file on a NIM server.

If the mksysb is going to be used to create a new machine, make sure to set 'recover devices' to NO when it is restored. This will insure that devices existing on the source machine aren't added to the ODM of the target machine.


2. Using the alt_disk_copy command.

If you have extra disks on your system, or have disks you would like to associate with one system, load a rootvg, then remove them and associate with a new system, this is a good way to copy the rootvg to them.

The basic command to do this would be:

# alt_disk_copy -BOd hdiskx

The -B option tells alt_disk_copy not to change the bootlist to this new copy of rootvg, the -O option will remove devices from your customized ODM database.

From the alt_disk_copy man page:

-O
Performs a device reset on the target altinst_rootvg. This causes
the alternate disk install to not retain any user-defined device
configurations. This flag is useful if the target disk or disks
become the rootvg of a different system (such as in the case of
logical partitioning or system disk swap).

When the disks containing this altinst_rootvg are moved to another host and then booted from, AIX will run cfgmgr and probe for any hardware, adding ODM information at that time.


3. Using alt_disk_mksysb to install a mksysb image on another disk.

Using this technique a mksysb image is first created, either to a file, on CD or DVD or tape.

Then that mksysb image is restored to unused disks in the current system using alt_disk_mksysb, again using the -O option to perform a device reset.

After this the disks could be removed and placed in a new system, or via fibre rezoned to a new system, and the rootvg booted up.


Advanced Techniques

1. Live Partition Mobility

Using the Live Partition Mobility feature of AIX you can migrate an AIX LPAR and applications from one LPAR to another while it is up and running. Please see the AIX Manual for further information:

http://publib.boulder.ibm.com/infocenter/aix/v6r1/topic/com.ibm.aix.baseadmn/doc/baseadmndita/lpm_overview.htm


2. Higher Availability Using SAN Services

There are methods not described here, which have been documented by DeveloperWorks.
Please refer to the document "AIX higher availability using SAN services" for details.

http://www.ibm.com/developerworks/aix/library/au-AIX_HA_SAN/index.html


Unsupported Methods

1. Using a bitwise copy of a rootvg disk to another disk.

This bitwise copy can be a one-time snapshot copy such as flashcopy, from one disk to another, or a continuously-updating copy method, such as Metro Mirror.

While these methods will give you an exact duplicate of the installed AIX operating system, the copy of the OS may not be bootable.


2. Removing the rootvg disks from one system and inserting into another.

This also applies to re-zoning SAN disks that contain the rootvg so another host can see them and attempt to boot from them.


Why don't these methods work?

The reason for this is there are many objects in an AIX system that are unique to it; Hardware location codes, World-Wide Port Names, partition identifiers, and Vital Product Data (VPD) to name a few. Most of these objects or identifiers are stored in the ODM and used by AIX commands.

If a disk containing the AIX rootvg in one system is copied bit-for-bit (or removed), then inserted in another system, the firmware in the second system will describe an entirely different device tree than the AIX ODM expects to find, because it is operating on different hardware. Devices that were previously seen will show missing or removed, and usually the system will typically fail to boot wi
th LED 554 (unknown boot disk).

AIX videos Links


http://www.ibm.com/developerworks/wikis/display/WikiPtype/Movies#Movies-power7


Welcome to the POWER6/POWER7 and AIX6 Hands-On Technical Product Demos
The idea is to provide the "cook book" information to get your started with these new interesting technologies and to answer some basic questions:

•What is it about?
•How do I get started?
•What are a few typical first good uses I could start with?
•How easy is it to use?
•How could this save me time or money?
•Where can I get more information?
We hope you find these movies interesting and let you make a flying start.

Currently, the movies add up to 20.6 hours of free education on the hottest topics.

Quick links to the main sections:

1.POWER7 Processor
2.AIX Workload Partitions
3.AIX6 and AIX7 Operating System Features
4.POWER6 Processor Features
5.Integrated Virtualization Manager (IVM)
6.Other Cool & Interesting Stuff
7.IBM System Director 6 on AIX
8.Thirteen More Director 6 Movies
9.Back to POWER Basics
10.New Virtualisation Features
11.PowerHA SystemMirror 7.1 for AIX
The latest movies added are:

•2nd Sept 2010 - How Systems Director Saves Me Time - movie 84
•12th Jan 2011 - Shared Storage Pools Hands-On - movie 85
•28th Jan 2011 - Shared Storage Pools Intro - movie 86
•March 2011 - HACMP = PowerHA System Mirror
◦On this Techdocs website the famous Shawn Bodily, Power/AIX Advanced Technical Skills, USA presents four technical movies on AIX High Availability. These are in .mov format. I had to download Apple QuickTime to view them as other players don't work (mostly audio problems).
•PowerHA SystemMirror 7.1 for AIX by HACMP Guru Alex Abderrazag - this includes a set of 6 movies:
1.PowerHA Introduction to a typical environment used in the movies
2.PowerHA Configuration via SMIT
3.PowerHA The "clmgr" command
4.PowerHA High Availability in Action
5.PowerHA SAN Communications
6.PowerHA Application Monitoring
Notes on getting the movies to work on your PC:

•These movies are in Windows Movie Format (.wmv) to make them small enough to watch over the internet or download but this means some quality has been lost from the Audio Video Interleave (.avi) originals which are 60 MB to 90 MBs in size.
•When tested on some PCs it took 4 to 5 minutes to start the movie - please be patient and don't just assume its broken - some browsers download the entire movie before they start playing it.
•Other browsers handle the media file differently - some start Windows Media Player and some start it within the browser itself. Also I have found that some auto resize the movie to fit the window - so start the movie in a suitable sized browser window. The movies where first recorded at 1024x768 but later ones at 800x600 but higher resolution. Sorry but I rather create new movies than try to regenerate them all to one size. If the movie does not fit your screen the best fix is to upgrade your screen to at least 1280x1024
•If all else fails try to download the .wmv file and play locally on your machine: using Right Click on the Download link below and selecting "Save Link as" or "Save Target as". This may highlight your PC does not support this format (good luck sorting that out!).
•Linux workstation users - ideas please, can Linux handle the .mwv format? If so, how or a good alternative solution is welcome.
◦I am told that Linux can indeed play this format - have a look at this website for hints Ubuntu - Installing Mplayer Codecs and installing OpenSUSE codecs is really simple too.
•Windows 7 users - some of the older movies do not work with Windows 7 Media Player. This appears to be missing CODEC's from Windows 7 that were in early Windows versions send your comments to Microsoft. We fixed this by downloading the ACELP CODEC from http://www.voiceage.com/acelp_eval.php - strictly at your own risk. I installed the Vista-64 version as I run Windows 7. Then watching the movie via the Windows Media Center (not the Player).
•For Windows 7 these movies have been remastered (August 2010) to fix Windows 7 problems of lack of certain CODECs found in earlier Windows versions, poor audio or hangs half way through: DFP, HMC7 Partition Mobility, Memory Keys, Partition Priority, CPU Pools and Monitoring Pools, Ganglia and PowerVM LX86.
•Feed back and further ideas for movies to
Nigel Griffiths - nag at uk dot ibm dot com

cluster states


QHA
The standard tool for cluster monitoring is clstat, which comes along with HACMP. Clstat is rather slow with its updates, and sometimes the required clinfo deamon needs restarting in order to get it operational, so this is, well, not good. There's a script which is a lot better. It is written by HACMP guru Alex Abderrazag. This script shows you the correct HACMP status, along with adapter and volume group information. It works fine on HACMP 5.2 until 6.1. You can download it here: qha. This is version 8.03 (latest update: 25/04/2007). For the latest version, check www.lpar.co.uk.

This tiny but effective tool accepts two flags:
  •   -n (show network info)
  •   -v (show shared online vg)
So, you can run # qha or # qha -v or # qha -n or # qha -nv

A description of the possible cluster states:
  • ST_INIT: cluster configured and down
  • ST_JOINING: node joining the cluster
  • ST_VOTING: Inter-node decision state for an event
  • ST_RP_RUNNING: cluster running recovery program
  • ST_BARRIER: clstrmgr waiting at the barrier statement
  • ST_CBARRIER: clstrmgr is exiting recovery program
  • ST_UNSTABLE: cluster unstable
  • NOT_CONFIGURED: HA installed but not configured
  • RP_FAILED: event script failed
  • ST_STABLE: cluster services are running with managed resources (stable cluster) or cluster services have been "forced" down with resource groups potentially in the UNMANAGED state (HACMP 5.4 only)


Monday, 11 November 2013

STEP BY STEP -CREATION OF LPAR

DOCUMENT TO CREATE LOGICAL PARTITION (LPAR )

GO TO HMC SELECT MANAGED SYSTEM IN WHICH YOU WANT TO CREATE LPAR 
>> SELECT THE MENU SHORTCUT BESIDES THE MANAGED SERVER OR SELECT TASKS FROM TOP >> SELECT CONFIGURATUONS >> SELECT CREATE LOGICAL PARTITION


PROVIDE THE NAME OF LPAR AND LPAR PROFILE NAME AS SHOWED IN THE NEXT SCREEN 


PLEASE SELECT THE NAME OF THE LPAR AND PROFILE NAME BY DETERMINING A NAMING SCHEME THAT SUITS FOR YOUR ENVIRONMENT 


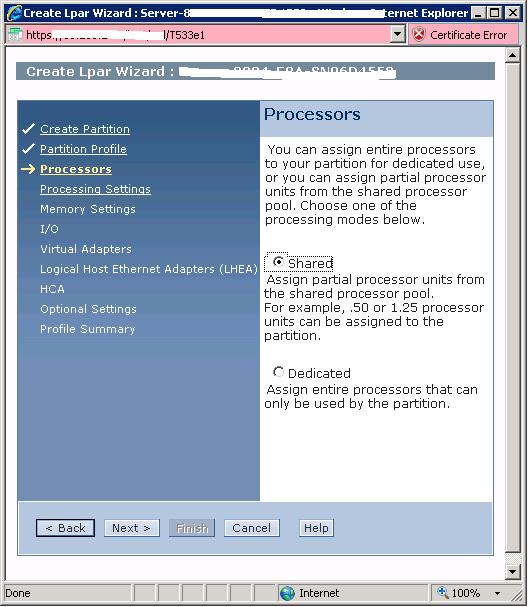
THE NEXT OPTION GIVES YOU DETAILS ABOUT SELECTING PROCESSOR SCHEME 
THE CURRENT OPTIONS ARE SHARED AND DEDICATED 
IF YOU SELECT SHARED PROCESSOR YOU CAN CONFIGURE MICRO PROCESSOR 
IF YOU SELECT DEDICATED PROCESSOR YOU CAN ASSIGN WHOLE (PHYSICAL) PROCESSOR ONLY 
NOTE IF APV IS NOT ACTIVATED ON THE PARTITION THE SHARED OPTION COULD NOT BE SELECTED AS SHOWN IN THE FIGURE BELOW


SELECT MINIMUM MAXIMUM AND DESIRED PROCESSOR VALUE 
MINIMUM PROCESSOR IS THE VALUE WITHOUT WHICH THE LPAR COULD NOT BE STARTED 
DESIRED IS THE OPTIMUM VALUE IN IDEAL CONDITION IF THE RESOURCES IS AVAILABLE AND LPAR WILL TRY TO AQUIRE THAT VALUE IF AVAILABLE 
MAXIMUM VALUE IS THE VALUE ABOVE WHICH THE LPAR CANNOT AQUIRE EVEN IF THE RESOURCE IS AVAILABLE IN SHARED POOL

READ THE LINK TO KNOW MORE ABOUT SHARED PROCESSOR

http://publib.boulder.ibm.com/infocenter/powersys/v3r1m5/index.jsp?topic=/iphat/iphatsharedproc.htm


IF APV ACTIVATION CODE IS PROVIDED YOU CAN SELECT  SHARED OPTION ALSO 
SELECT SHARED OPTION AND YOU CAN SEE LOTS OF NEW OPTIONS IN THE NEXT IMAGE 


IN THE ABOVE IMAGE THE OPTIONS WERE MIN PROC DES PROC AND MAX PROC
NOW YOU CAN FIND MIN PROC UNITS DES PROC UNITS AND MAX PROC UNITS IT CLEARLY SHOWS THAT NOW YOU CAN CONFIGURE MICRO PARTITIONS

YOU ALSO HAVE TO ASSIGN VIRTUAL PROCESSORS ACCORDING TO THE PHYSICAL PROCESSOR PROVIDED 

YOU CAN KNOW MORE ABOUT VIRTUAL PROCESSORS BY READING FOLLOWING DOCUMENT

http://publib.boulder.ibm.com/infocenter/powersys/v3r1m5/index.jsp?topic=/iphat/iphatvirtualproc.htm

TO KNOW HOW MUCH VIRTUAL PROCESSOR YOU NEED READ THE DOCUMENT
http://publib.boulder.ibm.com/infocenter/idshelp/v10/index.jsp?topic=/com.ibm.admin.doc/admin242.htm


PROVIDE MINIMUM MAXIMUM AND DESIRED MEMORY SETTING FOR THE LPAR
THE CONCEPT FOR MINIMUM MAXIMUM AND DESIRED VALUES ARE SAME AS PROCESSOR


PROVIDE THE IO ADAPTER , FOR EXAMPLE IN A TYPICAL CONFIGURATION  PROVIDE A FC ADAPTER AS REQUIRED AND A CDROM/DVD ADAPTER IF AVAILABLE AS DESIRED , ALSO PROVIDE A NETWORK ADAPTER AS REQUIRED


OR CREATE VIRTUAL SCSI ADAPTER AND VIRTUAL ETHERNET ADAPTER ON THE LPAR 

 SELECT BOOT MODE AND OPTIONAL SETTING OF THE LPAR


IN THE END IT WILL SHOW YOU SUMMARY OF LPAR JUST CREATED


YOU CAN NOW FIND THE NEWLY LPAR CREATED , SELECT THE FAST PATH MENU BESIDES THE LPAR AND SELECT ACTIVATE