Tanti Technology

My photo
Bangalore, karnataka, India
Multi-platform UNIX systems consultant and administrator in mutualized and virtualized environments I have 4.5+ years experience in AIX system Administration field. This site will be helpful for system administrator in their day to day activities.Your comments on posts are welcome.This blog is all about IBM AIX Unix flavour. This blog will be used by System admins who will be using AIX in their work life. It can also be used for those newbies who want to get certifications in AIX Administration. This blog will be updated frequently to help the system admins and other new learners. DISCLAIMER: Please note that blog owner takes no responsibility of any kind for any type of data loss or damage by trying any of the command/method mentioned in this blog. You may use the commands/method/scripts on your own responsibility. If you find something useful, a comment would be appreciated to let other viewers also know that the solution/method work(ed) for you.

Tuesday, 19 November 2013

How to delete a file using inode


If the part of file name has some invalid charecters then we may face difficulty in deleting that file, so the best option to delete the file would be using inode number.

Below is the command for the same:

 # find /directory -inum [inode-number] -exec rm -i {} \;

IBM Tivoli Storage Manager (TSM)


  TSM downloads and TSM commands
 All the TSM client downloads can be performed using the below IBM link:

http://www-01.ibm.com/support/docview.wss?uid=swg24027432


TSM Commands for aix admin:

All the below commands should be executed from /usr/tivoli/tsm/client/ba/bin  directory.

1. TSM command to restore all the files from TSM backup,
 

 dsmc restore -pick -subdir=yes


2. TSM command to check the list of files backed up in tabular form in AIX server and to select & restore from the list:


 dsmc restore -inac -pick -subdir=yes
   - If we need only files  that were backed up after a certain day or date,
dsmc restore -inac -pick -subdir=yes -fromdate=01/08/11


 3. If all the latest files has to be checked and restored from TSM backup, then


dsmc restore   -subdir=yes -latest


4. TSM Command to take selective backup of entire AIX system.


nohup dsmc selective / /usr/ /var/ /tmp/ /home/ /opt/ /rest of fs in the server/ -subdir=yes > /tmp/selective.out &

 - By doing so, you can view the progress using "tail -f /selective.out"


5. To trigger incremental backup


nohup dsmc incr > /tmp/increment.out &

  - By running the command in background it helps us to monitor the progress. "tail -f /tmp/increment.out

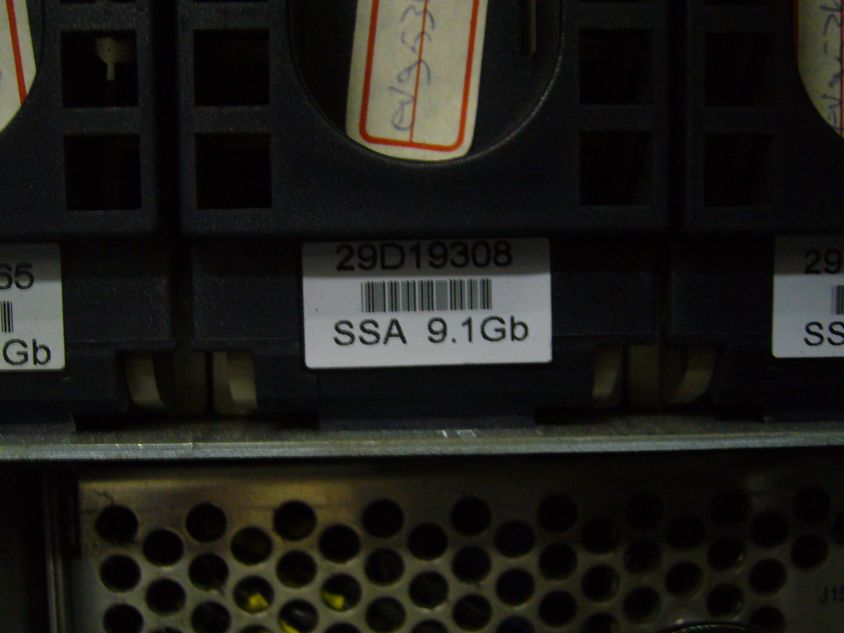
SSA storage picture AIX


Below you can see the SSA disks that are attached to the P series server.


Perform NIM operation without booting nim client machine to SMS mode:

Perform NIM operation without booting machine to SMS mode:


If you have any confusion or problem in finding out the ethernet adapter to select during the migration or any operation where you need to select the adapter for performing ping test or to start the installation through network, you can use the below command.


1. Find out the gateway of the servers where you need to perform the operation using below command:

netstat -nr
Destination        Gateway                                              
default             x.x.x.x --> gateway of client  

2.  In "ifconfig -a" o/p, select the interface/adapter(entX) which has an IP, which is reachable from your laptop.(which you use to do network boot)

3. Set the bootlist in such a way, so that after the server reboot the it boots through network.

bootlist -m normal entX  gateway=(GW of Client)  bserver=(NIM IP) client=(CLIENT IP)

Advantages:

1. You may not end up with shutting down the wrong server from HMC GUI.
2. You can overcome the ping test, where mostly people give wrong ip details.
3. Also helps if one has less experience about the SMS menu

dlpar not working between from hmc

Usually, if DLPAR fails due to below reason, its always problem with the rmc connection, which depends on RSCT daemons.


Error :

"A RMC network connection to the partition is not present. Verify the network settings on the partition and the HMC. If you select OK you will have to restart the partition for the resource changes to take effect."


Solution :

The very easy best thing, that we can do for making DLPAR to work is restart RMC along with the rsct group daemons, with the help of below three commands and wait for some 5 min, before you again test the dlpar capability.

# /usr/sbin/rsct/bin/rmcctrl -z
# /usr/sbin/rsct/bin/rmcctrl -A
# /usr/sbin/rsct/bin/rmcctrl -p


# lssrc -a | grep rsct
 
  - IBM.DRM should be in active state

Go back to the HMC restricted shell command prompt

# lspartition -dlpar
the partition shows correct hostname & IP
Active<1> and Decaps value 0x3f
The above values mean that the partition is capable of a dlpar operation.

If above things don`t work even you wait for 5 to 10 min, please execute the above commands followed by the recfgctcommand. Below is the command.

 
/usr/sbin/rsct/install/bin/recfgct

Wait for sometime and give a try. It should work for sure if the problem is with the RMC, rsct related otherwise the problem may be because of firewall between your hmc and the server.

Understanding the test(t) factor.


 Test factor 

For an existing volume group in AIX server, if we are adding any disk to it
( Typically extending the vg), on the new disk that we add everytime in a Volume Group there will be

(size of disk in MB )/ (PP Size) = # of PPs. ( desired )

If this number is greater than the 1016 limit we will need to change the t-factor.


If the above condition is met, where you have more than 1016 PP count, then this test or t factor come into picture. Hence we need to first find out the t factor value, that we should use.


Formula for calculating factor in chvg -t: 


factor * 1016 = desired # of PPs on the new disk
factor = # off PPs / 1016  ---> always round up this value.
Use the above obtained value in chvg command i.e,
#chvg -t vgname

Example:


Consider we have a VG in a AIX server with below details.

1. TOTAL PPs = 511
2. PP Size = 32 MB
3. Number of PVs = 1 and
4. The size of the disk that exists part of the volume group is 16384 MB.
5. Now i want to add a disk of size 32768 MB

  • First i need to find how many PPs will be hosted on the new disk that i am adding
32768 / 32 =  1024 --> this is more than 1016 which is the limit.
  • Now calculate the test(t) factor.
        factor * 1016 = 1024
        factor = 1024 / 1016 -> 1.007874016  -> If we round it up its "2" .
So use the value "2" in chvg command : "chvg -t 2 vgname"

Note: Increasing the t-factor decreases the number of PV's you can have in the volume group. 

Power HA migration

powerha migration detailed document


If anyone has any problems or need any help to perform the powerha migration, you can refer to the below document, which clearly illustrates how to perform the migration.

PROCEDURE :


Prework : (atleast 2 days before the actual migration)
(1)Check current version of HACMP is up and the cluster is stable.
# odmget HACMPcluster
# lssrc –ls clstrmgrES | grep state
(2) Verify the existing cluster and correct the problem if any error found
(3) Take the mksysb backup and also the copy of the below important files
     Save a copy of these files:
         /.rhosts
        /etc/hosts
          /etc/exports
        /etc/inittab
    Save a copy of these files
          /usr/es/sbin/cluster/netmon.cf
          /usr/es/sbin/cluster/etc/exports
          /usr/es/sbin/cluster/etc/rhosts
        /tmp/hacmp.log


(4) Take snapshot and save it to locally /tmp, and another copy in safest place like NIM server
(5)Take the clone for the rootvg disk on each server on the spare disk(extra luns should be mapped for taking the clone if it is not present) to ensure safer backout.If any issue comes, the server will be booted with this disk.
(6)Download all the requisite filesets, for the HA migration
Migration Procedure
Lets assume the one pair of participating cluster node as node1 and node2
Step 1: Stop Cluster Services on a Node Hosting the Application ( node1)
stop cluster services on node node 1 using the graceful with takeover option. (this is known as stopping cluster services and moving the resources groups to other nodes - .i.e node2 )
1.Enter smit hacmp
2.Use the System Management (C-SPOC) > Manage HACMP Services > Stop Cluster Services SMIT menu to stop cluster services.
3.Select takeover for Shutdown mode.
4.Select local node only and press Enter.
Now resource group containing the MQ to fall over to node node2 and verify it by
1] clRGinfo /usr/es/sbin/cluster/utilities/clRGinfo
2] execute command hostname
3] check with application team that application is running & all MQ channels are available
Step 2: Install the HACMP software
On node node1, install HA 6.1 filesets, which converts the previous HACMP configuration database (ODMs) to the desired format. This installation process uses thecl_convert utility and creates the /tmp/clconvert.log file. A previously created version of the file is overwritten.
To install the HACMP software:
#cd to the directory that contains filesets
1.Enter smit install
2.In SMIT, select Install and Update Software > Update Installed Software to Latest Level (Update All) and press Enter.
3.Enter the values for Preview only? and Accept new license agreements? For all other
field values, select the defaults.
Preview only select No
Accept new license agreement select Yes
4) Press enter

Step 3: Start Cluster Services on the Upgraded Node
Start cluster services on node node1.
To start cluster services on a single upgraded node:
1.Enter smit clstart
2.Enter field values as follows and press Enter
Start now, on system restart or both
Select now
Start Cluster Services on these nodes
Select local node (Default)
Manage Resource Groups Automatically/Manually
Select Automatically
HACMP brings resource group(s) online according to the resource groups’ configuration settings and the current cluster state, and starts monitoring the resource group(s) and applications for availability.
BROADCAST message at startup?
Select false
Startup Cluster Information Daemon?
Select true
Ignore verification errors?
Select false
Automatically correct errors found during cluster start?
Whatever value is in these fields will not make sense since it is a mixed cluster.
Note:Verification is not supported on a mixed version cluster. Run verification only when all nodes have been upgraded.
Step 4: Repeat the same steps for the node2
Step 5 :Verifying the Upgraded Cluster Definition
After the HACMP 6.1 software is installed on all of the nodes in the cluster and cluster services restored, verify and synchronize the cluster configuration. Verification ensures that the cluster definition is the same on all nodes. You can verify and synchronize a cluster only when all nodes in the cluster are running the same version of the software. 
 
To verify the cluster:
1.Enter smit hacmp
2.In SMIT, select Extended Configuration > Extended Verification and Synchronization > Verify Changes only and press Enter.


Verifying Software Levels Installed Using AIX 5L Commands
Run the commands lppchk -v and lppchk -c “cluster.*”
Both commands return nothing if the installation is OK.
perform the another failover to check the RG movement after the upgrade on both nodes.
How to Backout if anything goes wrong :
Boot the server with the clone disk in case of any issue